Hi, guys!
Call me Somi or Avel or Happy,
whatever you want.
This is our first lesson
and it will be about the basic
step to do Photoshop.
I am using Photoshop CS2 right now,
but I used to use Photoshop 7.0.
There is not much difference, but,
I hope amateurs use ver 7.0 first.
Okay, let's open photoshop first!
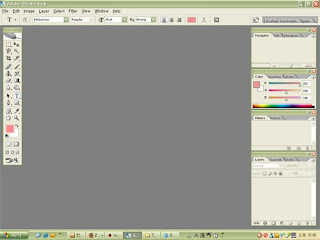
it's quite simple, isn't it?
so, let's see what are the tools.
 hehe, i pressed the type tool,
which I use to type something.
That tool is 'horizontal type tool'.
I will name the tools:
Rectangular Marquee /Move
Magnetic Lasso / Magic wand
Crop / Slice
Spot healing brush / Brush
Clone stamp / History brush
Eraser/ Gradient
Blur / Burn
Path Selection / Horizontal Type
Pen / Rectangle
Notes / Eyedropper
Hand / Zoom
Foreground colour / Background colour
Edit it Standard Mode / Edit in Quick Mask Mode
Standard Screen / Full screen with menu bar / Full Screen
Edit in ImageReady
and more and more and more.
Now, you can guess all the functions from the name of all the tools.
Shall we learn how to make simple name tag ?


